Plain text slides
I’m a long-time fan of using the xaringan package to create slides1 (as you might know from my blog). I’ve always appreciated that you can use R Markdown (or just regular markdown) to write your slides, but you can also use HTML, CSS and JavaScript to customize your slides. You can write in plain text, or you can turn each slide into a small web project.
Web-based slides can be shared with others online and tend to be more accessible than traditional slide formats. And with packages like renderthis – a package by John Helveston and me – you can even get PDF and other formats easily.
PDF slides and the case of the missing images
But PDF slides come with a few challenges of their own, most of which are related to the fact that you’re essentially using the browser’s printing features to print your slides to PDF.
The one that I’ve seen most often in PDFs is that images that happily render in the browser can suddenly disappear from the PDF version of the slides. Here’s how I described the problem in an issue in renderthis:
Chrome’s printing algorithm…excludes images that extend beyond the visible margin from printing. I’m sure [there’s a reason for this that] makes sense for general webpage printing, but it does cause problems for slides.
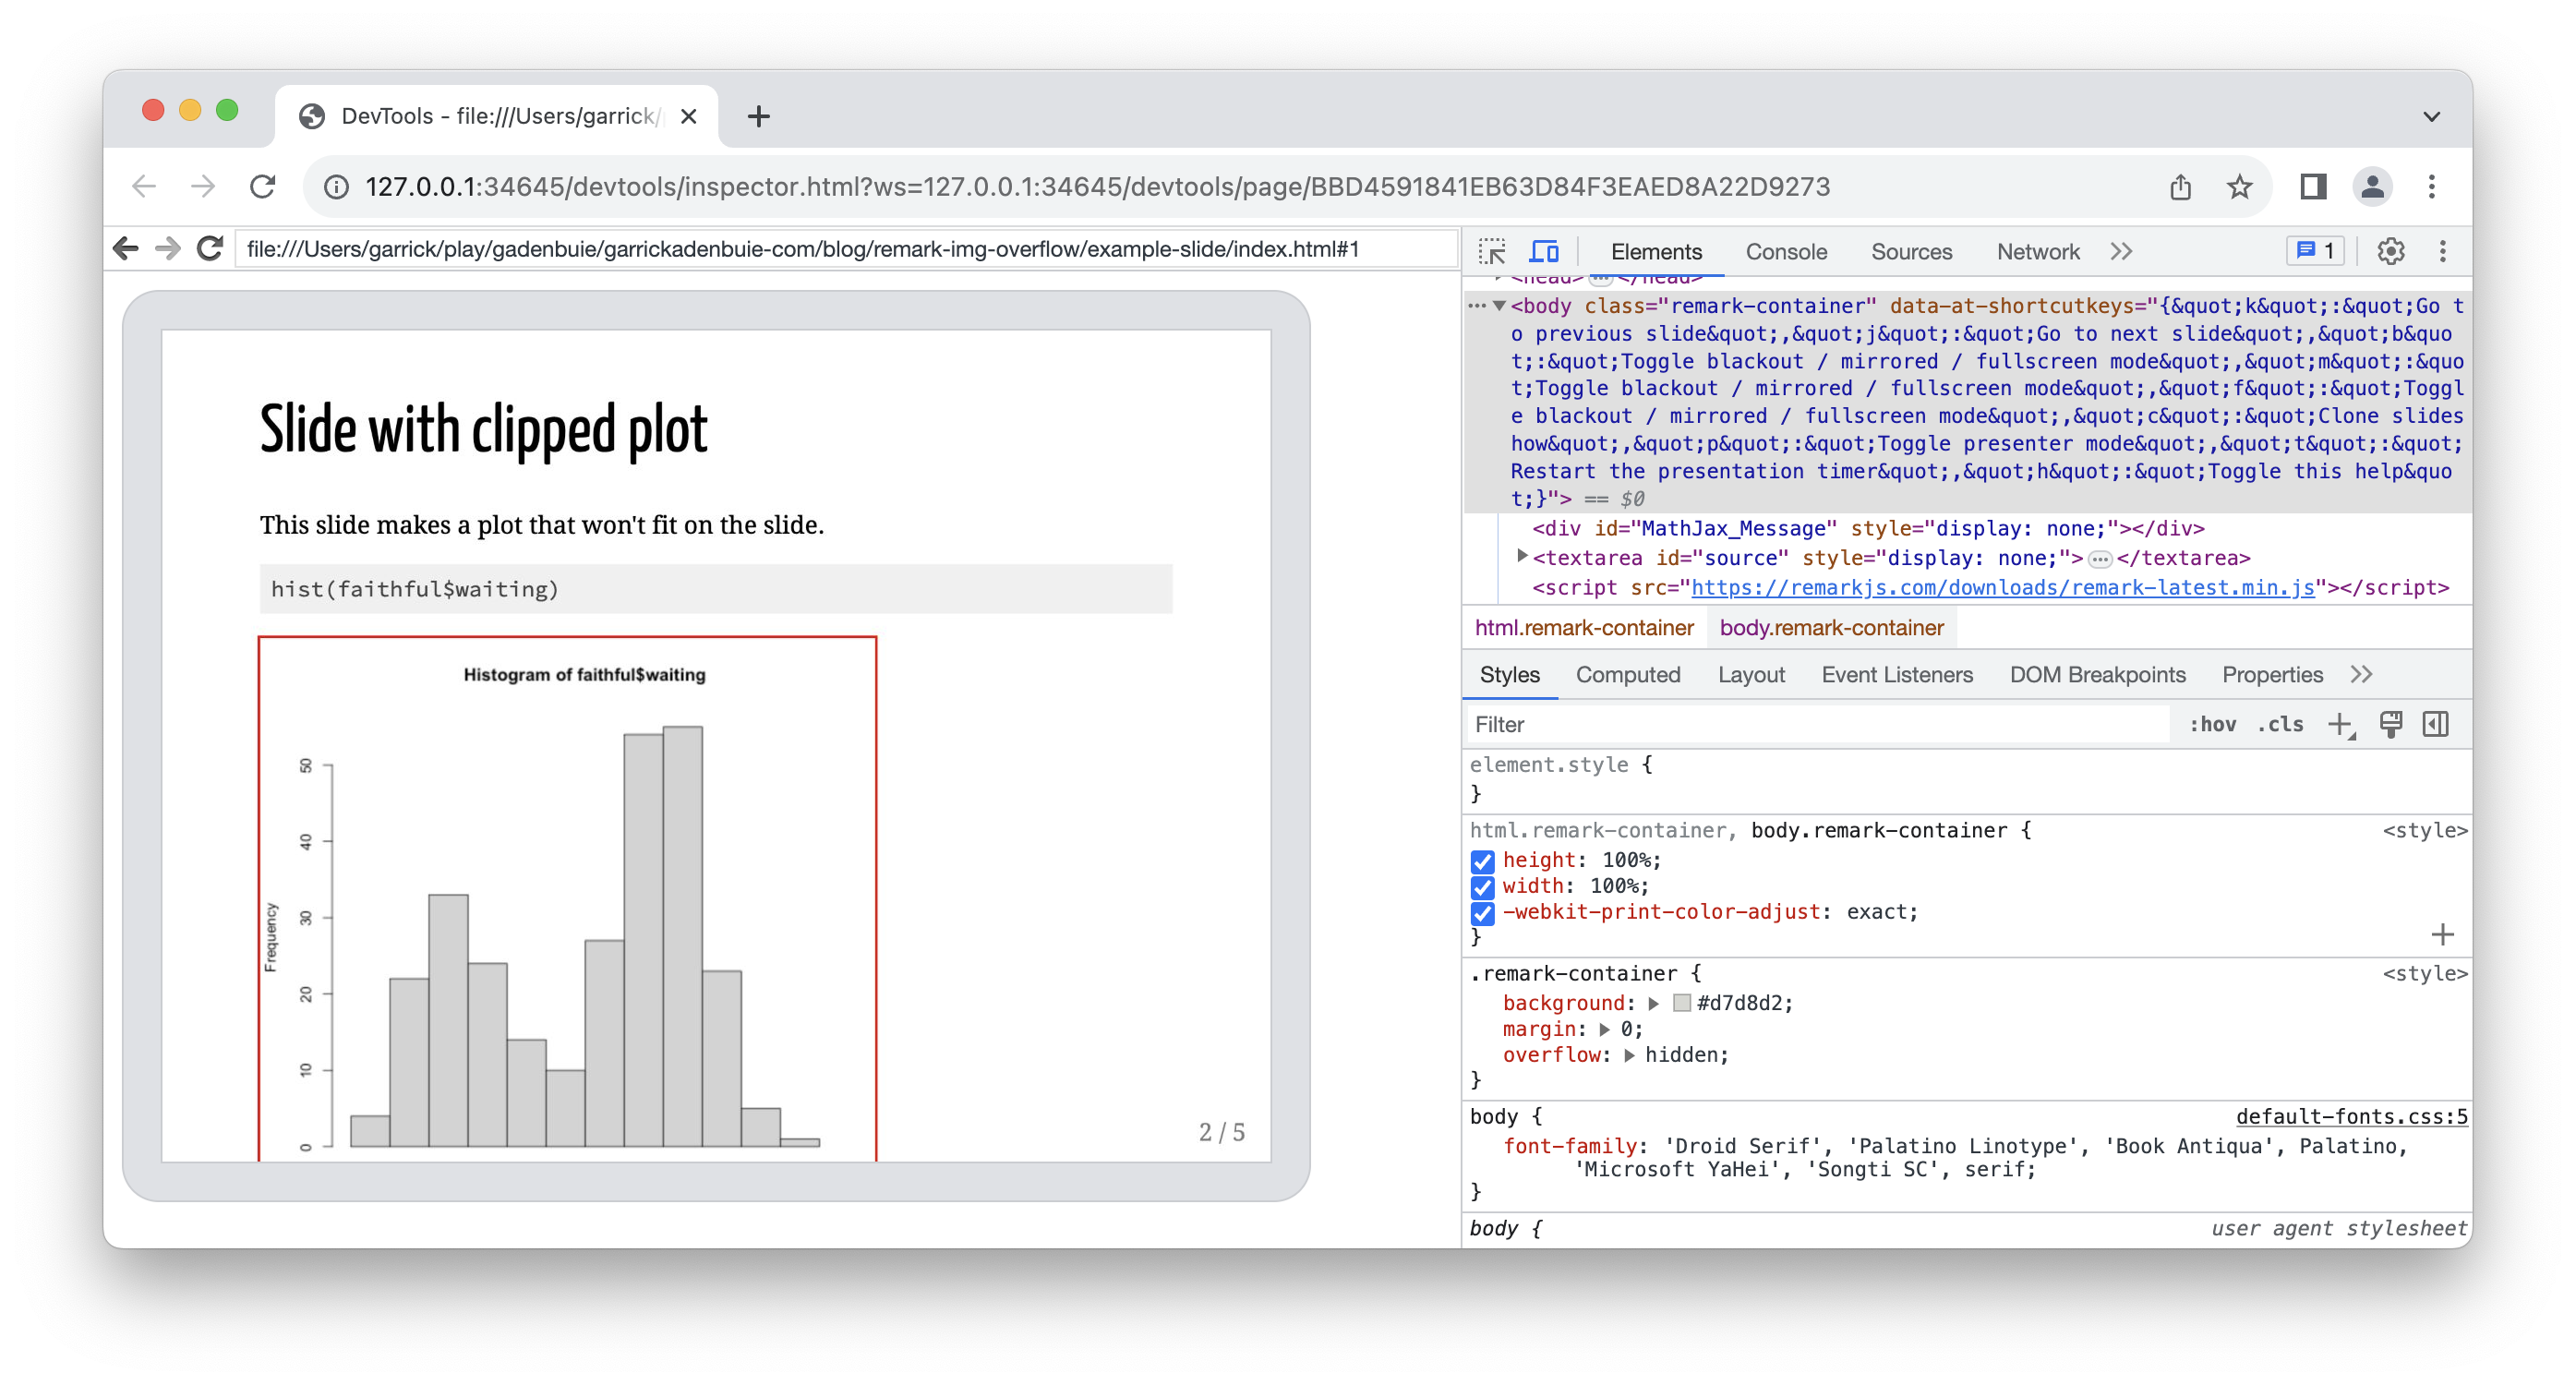
It can be hard to tell visually if the plot extends past the margins of the slide because the actual image may include empty space that you can’t see.
Often plots and other images include some empty space at the edges that can overflow the slide in a non-obvious way. The trick I tend to use is to add a red outline around all the images in the slides during development (or just before publishing the slides):
img, svg {
  outline: 1px solid red;
}
More slides, more problems
That little CSS trick works well enough if you’re in the middle of writing the slides, but it’d be a pretty terrible process to have to do this manually for, say, 530 slides a dozen times or more over the next three months.
If that sounds like an oddly specific example, that’s because it is. I was reminded of this problem by Greg Wilson’s recent bat signal toot:
plea for help; macOS; open source; command-line; PDF
dear lazyweb: is there a command-line tool for macos that will take a PDF and produce a 4-up or 6-up PDF? I need to check the layout of a bunch of slides (because I haven’t figured out how to get the remark slideshow tool to tell me when an SVG image in a slide overflows, so I’m going to have to eyeball ’em). thank you
Greg Wilson @gvwilson@mastodon.social – Jul 20, 2023, 19:24
This is exactly the kind of task I would want to automate, and it’s an exquisitely designed and irresistible nerd snipe. I’ve used chromote (and headless Chrome) before to automate printing complex xaringan slides, so I know there’s a good chance its doable.
So the rest of this post is a quick exploration of how to use a remote-controlled browser (via chromote) to load the slides and detect any images that are clipped.
Example slides
I’ve created a small example slide deck that has a few slides with images that “accidentally” go beyond the edges of the slides. We’ll use this as our test case.
Automate it!
I absolutely love taking an annoying manual process and turning it into runnable, repeatable code. Automate all the things!
We can automate slide-image overflow with these 4 steps:
Fire up headless Chrome and load the slides in the virtual, remote-controllable browser.
Determine the natural desired size of the slides (in pixels) and then set the virtual browser window to this size. This isn’t strictly necessary, but it makes the math much easier later on, so it’s worth it.
Make all of slides visible at once. Otherwise, remark (the JavaScript library that powers the slides) hides all of the slides except the current slide. Elements that are hidden from the browser don’t have a size, ruining our ability to detect overflow.
Finally, find all of the images in the slides and check if any escape the slide (browser window) boundaries.
With chromote
Now we get to the fun part. First we need to start up chromote and initialize a new browser session.
library(chromote)

chrome <- ChromoteSession$new()
I’ve stored the example slide deck in a folder called example-slide, and I’ve already rendered it from index.Rmd to index.html. To load the file in Chrome, we need the full path to the file, prefixed with file://, e.g. file:///Users/garrick/.../example-slide/index.html.
slide_path <- file.path("example-slide", "index.html")
slide_path_uri <- file.path("file:/", normalizePath(slide_path))
Now we can load the slides in Chrome. I’m using a small trick here to make sure that the R session waits for the browser to load the page. The trick is to request the Page.loadEventFired event via chromote asynchronously (wait_ = FALSE), then load the page, after which the we block the R session until the page load event fires.
pl <- chrome$Page$loadEventFired(wait_ = FALSE)
chrome$Page$navigate(slide_path_uri, wait_ = FALSE)
#> <Promise [pending]>

# Block until the page load event fires
chrome$wait_for(pl)
#> $timestamp
#> [1] 195025.8
That’s not something you usually have to do with chromote when you’re interacting with pages on the web (because those take long enough to load), but local pages load very quickly, sometimes faster than the R expressions are evaluated. (In other words, if you execute the navigate command and then wait for page load event, you might miss it.)
Match window size to slide size
Now that we have our slides loaded in the headless browser, we need to figure out what size they are. remark uses some rather random pixels values based on the specified slide ratio, so the easiest thing to do is find the first visible slide and figure out what size remark used.
Here’s a small JavaScript function that will do that for us:
function get_slide_size() {
  // Find the first visible slide in the deck
  const visible_slide = document
    .querySelector('.remark-visible .remark-slide-scaler')

  // and inspect it's width and height
  // knowing that remark will set these values
  const {width, height} = visible_slide.style

  return {
    width: parseInt(width),
    height: parseInt(height)
  }
}
We the use the $Runtime$evaluate() methods of the chromote object to run the JavaScript function definition, by passing the JS code as a string2.
Loading the function in the browser via chromote
chrome$Runtime$evaluate("
function get_slide_size() {
  // Find the first visible slide in the deck
  const visible_slide = document
    .querySelector('.remark-visible .remark-slide-scaler')

  // and inspect it's width and height
  // knowing that remark will set these values
  const {width, height} = visible_slide.style

  return {
    width: parseInt(width),
    height: parseInt(height)
  }
}
")
Now that we’ve loaded the function in the browser, we can call it to get the size of the slides. Here we again use $Runtime$evaluate(), but I’ve added returnByValue = TRUE to the call to get the result of the JS expression back in R.
slide_size <-
  chrome$Runtime$evaluate(
    "get_slide_size()",
    wait_ = TRUE,
    returnByValue = TRUE
  )

# Extract the result we want from Chrome's response
slide_size <- slide_size$result$value
slide_size
#> $width
#> [1] 908
#>
#> $height
#> [1] 681
With the slide size in hand, we can set the size of the virtual browser window using the $Emulation$setVisibleSize() method.
chrome$Emulation$setVisibleSize(
  height = slide_size$height,
  width = slide_size$width
)
If you wanted to be certain everything is set up correctly, you could call chrome$view() now and see the slides your browser’s seeing.
Make all slides visible
With our slides loaded in the browser, we need to make them all visible. This trick involves finding all of the slides in the deck – using the .remark-slides-area .remark-slide-container selector – and then add the remark-visible class to each slide. This is the class that remark toggles to show and hide the slides when you move through them.
document
  .querySelectorAll('.remark-slides-area .remark-slide-container')
  .forEach(slide => slide.classList.add('remark-visible'))
Detect clipped elements
Detecting if an element is clipped is easy now that we’ve made all the slides visible and set the browser window to match the slide size exactly.
The core idea in this function is to use the getBoundingClientRect() method to get the position of the element relative to the browser window. If any side of the element is outside of the window, then the element is clipped.
function is_element_clipped(el) {
  const { top, left, bottom, right  } = el.getBoundingClientRect()
  return top < 0 ||
    left < 0 ||
    right > window.innerWidth ||
    bottom > window.innerHeight
}
If we hadn’t resized the virtual browser window to match the slide size, then we would have to do figure out the slide’s size and the element’s relative position within it to determine if the element is clipped.
If we’ve found a clipped element, we can extract some useful information about it that we’ll use in R to learn about our problematic images. I also threw in a console.log() element so that, you if were to use this code in a head-full browser, you’d get a nice console message about the clipped image.
function clipped_img_info(el) {
    // If you're looking at the slides in the browser,
    // this will logged the clipped images in the console.
    console.log("clipped image", el)

    return {
      img_tag: el.tagName,
      img_src: /^data:/.test(el.src) ? el.src.slice(0, 32) : el.src,
      img_class: el.classList.toString(),
      slide_heading: el.closest('.remark-slide')
        .querySelector('h1, h2, h3, h4, h5, h6')
        ?.innerText,
      slide_text: el.closest('.remark-slide').innerText,
    }
  }
Now we’re at the best part. We use .querySelectorAll() to find all images (or SVGs) in our slides, filter them to include only those that are clipped, and then extract the information we need about the clipped images.
document
  .querySelectorAll(
    '.remark-slides-area .remark-slide :is(img, svg)'
  )
  .filter(is_element_clipped)
  .map(clipped_img_info)
Find all the clipped images
To make life a little easier, I wrote all of the above JavaScript code into a file called find-bad-images.js. If you want, you can download that file and use it directly. Here, I’ll read the contents and pass the string of JavaScript to chromote to get the results.
bad_images <-
  chrome$Runtime$evaluate(
    paste(readLines("find-bad-images.js"), collapse = "\n"),
    wait_ = TRUE,
    returnByValue = TRUE
  )
With a little bit of data reshaping, we’ve got a nice table of all the images we need to fix in our slides.
bad_images$result$value |>
  purrr::map_dfr(~ .) |>
  dplyr::mutate(img_src = basename(img_src))
#> # A tibble: 3 × 5
#>   img_tag img_src    img_class   slide_heading              slide_text
#>   <chr>   <chr>      <chr>       <chr>                      <chr>
#> 1 IMG     plot-1.png ""          Slide with clipped plot    "Slide with clipped…
#> 2 IMG     plot-1.png ""          Absolutely positioned plot "Absolutely positio…
#> 3 svg <NA> "bi bi-bug" SVG too big! "SVG too big!\n4 / …Footnotes
R users know of these slides as xaringan slides, but the underlying technology is remark, a JavaScript library for creating slides from plain text.↩︎
My least favorite way to write code of any language is inside a string literal of another language. 🤪↩︎